Sometimes it's necessary to connect different Message Brokers together. In Enterprise Messaging this scenario is known as Bridging. It can be done with JMS and different protocols like AMQP, ActiveMQ Artemis core protocol. This blogpost focusses on Bridging with JMS and two Apache ActiveMQ Artemis Brokers running which are running in WildFly.
What's a JMS Bridge?
JMS Bridges typically are used to connect Queues and Topics on different brokers or servers.
The Bridge forwards messages from a source to a target broker whereas both brokers do not have to be in the same
cluster.
That makes bridging suitable for reliably sending messages from one cluster to another, for instance across a WAN,
and where the connection may be unreliable.
It can also be used for horizontal scaling of Message Brokers like HiveMQ does.
The horizontal Bridging Scenario
There are two different deployment scenarios. In this blogpost I am configuring the Bridge inside a WildFly by using the source Broker. It's also possibile to use an additional ActiveMQ Broker as Bridge which would located in the middle of both Brokers.

The previous picture shows the scenario we want to configure.
As you can see we need to configure a Queue on the source Broker, a Queue on the target Broker and we need some
configuration to connect both Queues.
Note: I didn't find a better image for devices. Therefore I chose the iPhone image. Feel free to
visualize something else ;-)
Configuring the Source Broker
In the first step you have to download and unzip a
WildFly server two times for source and target as you can see in the previous picture.
In the next step you have to configure the standalone-full.xml of your source
WildFly which is located in the standalone/configuration folder of WildFly.
After opening the XML file you have to add a Source Queue to the Source Broker by adding the following snippet to
the
standalone-full.xml:
 This snippet creates a new JMS Queue with name JMSBridgeSourceQueue.
In the next step you have to configure the Bridge.
A Bridge has got lots of configuration options like max-batch-time, max-retries and so on.
This isn't part of this post.
This snippet creates a new JMS Queue with name JMSBridgeSourceQueue.
In the next step you have to configure the Bridge.
A Bridge has got lots of configuration options like max-batch-time, max-retries and so on.
This isn't part of this post.
The next more important configurations to get the Bridge up and running are the source tag which points to the
formerly created jms-queue and the target tag which contains configurations for the target queue of the destination
broker.
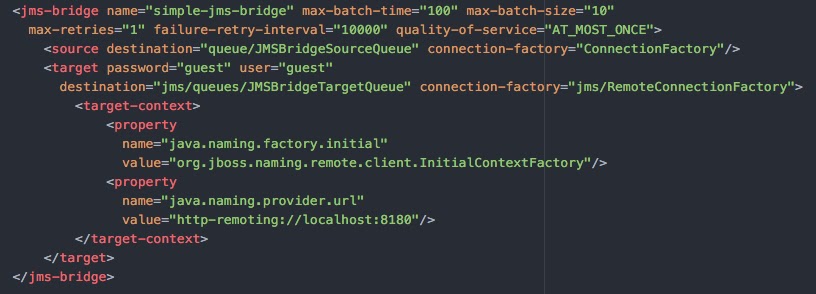 As you can see the target broker needs a authentication.
Therefore you need to create a Application User on the target Broker.
As you can see the target broker needs a authentication.
Therefore you need to create a Application User on the target Broker.
Configuring the target Broker
After configuring the source Broker you have to configure the target one.
As described before the JMS Bridge requires an Application User which has to be added on the destination Broker and
referenced in the source Broker
standalone-full.xml file.
This Application User can be created by using the add-user.sh script which is located in the bin folder.
In the last step you also have to configure the standalone-full.xml file of the target Broker.
 You have to create a JMS Queue with the same name as the destination of the soure Brokers Bridge configuration.
That's it.
In the last step you can start both servers and check the logfiles.
The Bridge is up and running if both WildFlies start sucessfully without any errors.
You have to create a JMS Queue with the same name as the destination of the soure Brokers Bridge configuration.
That's it.
In the last step you can start both servers and check the logfiles.
The Bridge is up and running if both WildFlies start sucessfully without any errors.
Starting the Brokers
./standalone.sh -Djboss.socket.binding.port-offset=100 -c standalone-full.xml
./standalone.sh -c standalone-full.xml
Conclusion
A JMS Bridge can be configured with lots of properties. Quality of service, max-batch-time and max-batch-size max-retries and a failure-retry-interval.
Have fun with your JMS Bridge!Bye,
Bennet
Be Social, Share!